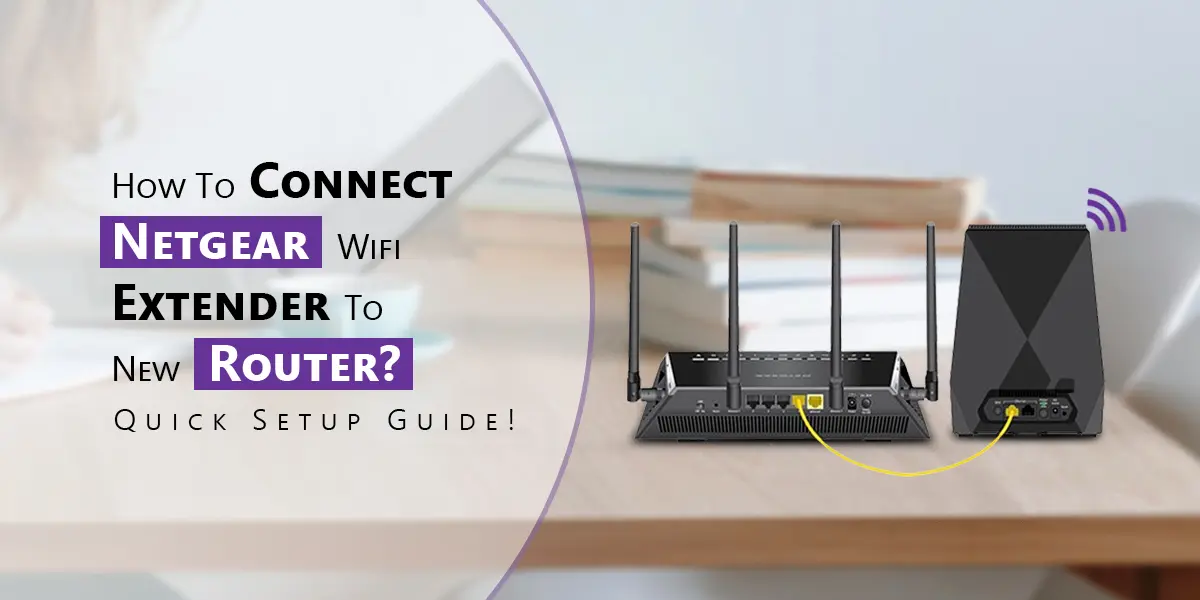
Having a reliable Wi-Fi connection across your house or place of business is vital in today’s environment, when being connected is vital. Large areas or several barriers, however, may result in weak signals and dead zones with inadequate Wi-Fi coverage. A WiFi extension is useful in this situation. Connect Netgear Wifi Extender To New Router may seem difficult if you’ve recently moved to a different one, but it’s actually very simple if you follow the correct instructions.
To ensure that your location has the best Wi-Fi coverage possible, we’ll walk you through the process of Connect Netgear Wifi Extender To New Router in this article.
Why is a WiFi extender necessary?
Let’s first examine the reasons why you might require a Wi-Fi extender before moving on to the stages. By boosting the wireless signal from your router, a WiFi extender may reach places where the signal is either nonexistent or too weak. Large residences, multi-story buildings, or locations where the router’s signal has trouble passing through walls or other obstructions may find this to be of particular help.
The following advantages are available when you use a WiFi extender such as the Netgear model:
· increased Wi-Fi coverage, removing dead areas.
· uninterrupted internet connectivity in distant rooms from the router.
· Wi-Fi that is steady and reliable for every device connected.
Let’s begin connect netgear wifi extender to new network now that you understand the importance of a Wi-Fi extender.
How to connect netgear wifi extender to new modem
1. Reset Netgear router
It’s crucial to return the Netgear extender to factory settings before connecting it to a new router if you’ve ever used it with an outdated one. By doing this, possible conflicts during the setup process are avoided and any outdated network configurations are guaranteed to be removed.
Resetting instructions:
· Pause for extender to turn on after beavering it into power vent.
· Find reset switch.
· Hold down reset switch
· The extender will flash its LED lights to show that it is resetting.
· The extender will start up again after being reset, recurring all settings to their primary settings.
2. Position Extender in Best Place
Place WiFi extender midway among location where you need enhanced Wi-Fi coverage and your new router. For best coverage, place the extender near enough to the dead zone but yet within range of the new router’s Wi-Fi signal.
3. Turn the extender on
Plug the extension into a wall outlet after positioning it in the best possible spot. After a short time, the extender will be prepared for setup when its LED indications light up.
4. Use WPS to link extender to new router
Using the WPS button is one of the simplest and quickest ways to Connect Netgear Wifi Extender To New Router. WPS is useful since it is supported by the majority of contemporary Netgear WiFi extenders and routers.
· To establish a WPS connection, find the WPS button on both the Netgear extension and your new router.
· First, press the extender’s WPS button. The WPS LED ought to begin to blink.
· Press router WPS switch.
· A successful connect netgear wifi extender to new network will be indicated when the WPS LED on the extender turns solid.
Note: You might need to repeat this procedure for both bands if your router has distinct 2.4 GHz and 5 GHz bands (some extenders offer dual-band connections).
After Connect Netgear Wifi Extender To New Router, the extender will often establish a new Wi-Fi network with the same SSID (Service Set Identifier) as your router, but with the suffix “_EXT” added. For instance, the expanded network can show up as “HomeWiFi_EXT” if the SSID of your router is “HomeWiFi.”
5. Use the Web Browser Setup Method to Connect
You can utilize the web-based setup approach if your new router does not support WPS or if you would rather set things up manually.
Procedures for configuring the web browser:
· Link your computer, tablet, or phone to the Netgear extender’s built-in wireless network. Typically, this network is called “NETGEAR_EXT.”
· Launch a browser and go to www.mywifiext.net. This will launch the login page for the Netgear extender.
· You’ll be requested to list for new account or login. Produce new account if this is first time constructing extender.
· The setup wizard will take you through Connect Netgear Wifi Extender To New Router after you’ve logged in. From a list of accessible networks, you must choose the Wi-Fi network on your new router and input the password.
· The extender will apply modifications and reboot after linking has been done.
· Similar to WPS, the extender will use the router’s SSID with the “_EXT” suffix to establish a new extended Wi-Fi network.
6. Verify the Connection
· To make sure everything is functioning properly, it is crucial to verify the connection after finishing the setup.
· Connect Netgear Wifi Extender To New Router using a device.
· Check to see if the Wi-Fi signal is strong and steady by moving about your house or place of business, paying particular attention to places where it was previously poor.
· For improved coverage, think about moving the extension if you see any weak areas.
7. Maximize the Position of the Extender
It might be necessary to move the extender to get the most out of it. The objective is to cover the dead zones in your house or place of business while positioning the extender such that it can still get a strong signal from the router.
To assist you in finding the ideal location, the majority of contemporary Netgear WiFi extenders have LED indications. The proximity of the extension to the router is shown by these LEDs. To improve coverage, make sure the signal strength is at its best.
Solving Typical Problems
You may run across some problems even though netgear router setup process is usually easy. Here are few distinctive matters and how to solve them:
· Extender not connecting: If the extender is not connecting to the router, make sure the new router can reach it. Try reorganizing extender and commencing setup process over if the connection is still lost.
· The expanded network’s slow internet: Verify the position of the extension. It may be too far from the router or in an area with interference (such as near microwaves or cordless phones).
· Unable to go on mywifiext.net: Make sure device is allied to extender default WiFi network before accessing the setup page.
Final thoughts
Your home or workplace network coverage may be significantly increased by simply Connect Netgear Wifi Extender To New Router. Following the instructions in this article should guarantee a successful and seamless connection, regardless of whether you choose to utilize the web browser setup or the WPS approach. By correctly Connect Netgear Wifi Extender To New network, you can eliminate annoying dead zones and guarantee that all of your devices remain connected while enjoying uninterrupted internet access across your area.